
Below are some notes regarding DTMF encode and DTMF decode on Retevis RT85 and TYT TH-UV88 portable radios.
Manually Sending DTMF From the Front Panel Keypad
The main thing to know about DTMF operation on these radios is that you *do* need to use the PC programming software to set up the parameters for DTMF speed-dial encode and for DTMF decode.
However, to send DTMF manually from the front panel keypad you don’t need to do any setup at all. To send DTMF manually simply press the PTT and then press the first DTMF digit you wish to send. You can then release the PTT and the transmitter will stay active for about 2 seconds after the last DTMF keypress. So if you continue to press keys on the keypad, the radio will continue to transmit DTMF signals (without a need to continue to hold the PTT active). About 2 seconds after you release the last front panel keypad button the PTT will go inactive.
Setting up DTMF Speed-Dial and DTMF Decode
The only front panel controls that are available (as far as I’ve been able to determine) for DTMF operation is to (a) manually send from the keypad, (b) for selecting which of 16 pre-configured DTMF sequences will be transmitted by the radio and (c) the process to cause those DTMF sequences to be transmitted over the air. That’s all I’ve been able to control from the front panel for DTMF. Everything else (selecting the DTMF sequence that’s used for decode, the duration of the tones when transmitted, etc) needs to be done with the PC program.
Configuring the DTMF Auto-Dialer generator (encoder)
Once you have set up the programming software on your PC, and have read data from the radio to the PC, look at the main page, the one where you set RX and TX radio frequencies. Off to the right is a column labeled Signal. On those memory channels where you want to use DTMF speed-dial or DTMF decode you need to set this variable to “DTMF”. If this memory doesn’t have the signaling value set to DTMF then you won’t be able to do DTMF speed-dialing or DTMF decode on that memory channel.
In the PC programming window for DTMF (DTMF Menu), the Dtmf Encode table on the left with 16 line entries holds the DTMF speed-dial sequences that you can transmit.

You enter data into this table directly using your mouse and keyboard. You can only populate values in this table from the PC software, and not the front panel of the radio.
You can store up to sixteen DTMF sequences in this table – these are the DTMF sequences that you can transmit as DTMF speed-dial sequences. You use front panel Menu item #10 to select which of the 16 DTMF sequences that you want to send ( NOTE: you have to have use the PC software to set the particular RF channel memory to signaling type DTMF in order to transmit the DTMF speed-dial sequences.) To cause the DTMF speed-dial sequence to be transmitted over the air press-and-hold the PTT button and then press-and-hold the Signaling Button (the Signaling Button is the button above the PTT button). When you hear the tones coming from the speaker on the radio you can release both the PTT and Signal buttons. The DTMF sequence will continue to be transmitted until completion. Note that even when your radio is waiting to receive the correct DTMF sequence (Own ID) to open the squelch, pressing the PTT button will temporarily unlock the DTMF decoder, so that you will be able to hear the responding station, provided that they respond to you within the time specified by the Auto Reset Time variable (see below about Auto Reset Time).
Returning to the PC programming window for the DTMF Menu, the DTMF Setting field in the upper right side of the window controls the DTMF encoder in the radio (ignoring the Auto Reset Time variable as well as the Stun and Kill Codes for now).
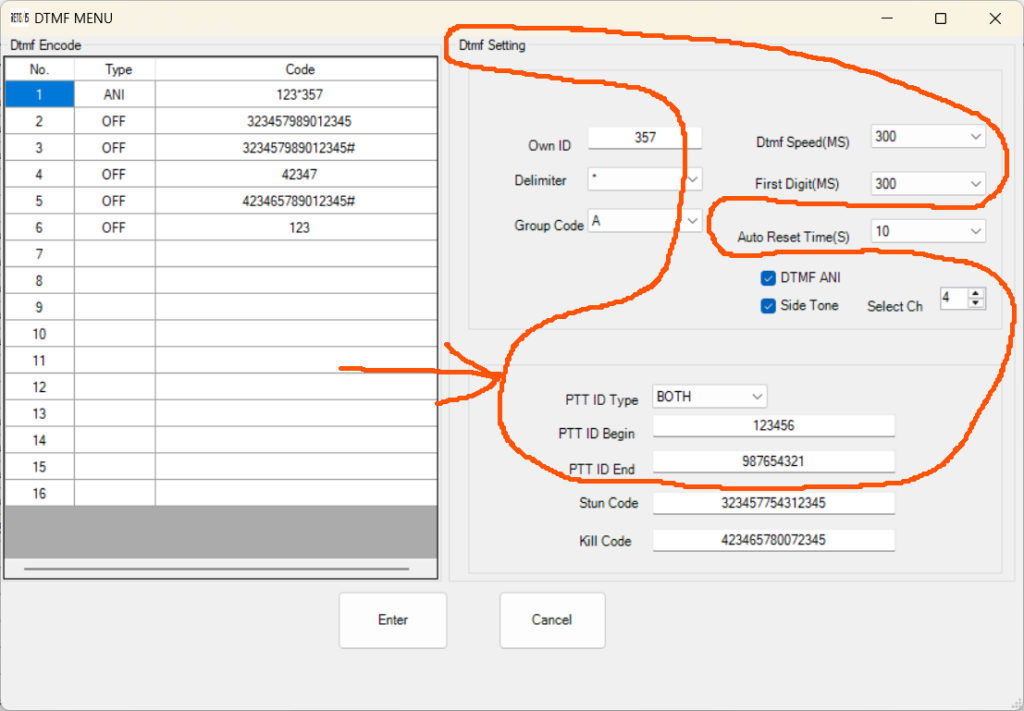
The PTT ID feature appears to be for commercial users outside of North America. The PTT ID Type setting allows configuring the radio to transmit a particular DTMF sequence every time the PTT button is press and a different DTMF sequence when the PTT button is released. The valid settings for PTT ID Type are OFF, BEGIN, END and BOTH. Setting PTT ID Type to anything other than OFF is sure to cause you to lose radio friends, as sending DTMF every time you press (or release) the PTT will be very annoying to others who use the same channel. The DTMF sequence that is transmitted when PTT is first activated is determined by the contents of the PTT ID Begin field when PTT ID Type is either BEGIN or BOTH. The DTMF sequence that is transmitted when PTT is released is determined by the contents of the PTT ID End field when PTT ID Type is either END or BOTH. Again, to maintain your on-the-air friendships leave PTT ID Type set to OFF.
In the upper right of this area of the display window are values that determine how long each DTMF symbol is transmitted. First Digit(MS) and DTMF Speed(MS) are the durations of the first transmitted DTMF digit and all following transmitted DTMF digits, respectively, in milliseconds. There’s no user control for the inter-digit quiet time – it is what it is. I like 500ms for first digit and 200 ms for each additional digit.
Be sure to check the SideTone box. This will cause the DTMF signals you are transmitting over the air to also be produced by the loud speaker within the radio, so that you can hear the tone progress, and know when the DTMF sequence has ended.
The Select Ch option let’s you choose the default value of the pointer into the DTMF Encode table to use the first time after programming. There may be other events that will cause this value to be used, but I haven’t determined those yet. Once you choose a new pointer into the DTMF Encode table via menu option 10 (“F”, “1”, “0” or just “F”, “0”) then that value seems to stay the same until the radio is reprogrammed from the computer.
WHAT DOES “DTMF ANI” DO? NEED TO INVESTIGATE FURTHER ON THIS.
Configuring the DTMF detector (decoder)
Below are the variables that form the DTMF decoder function.

Own ID is the DTMF sequence that your radio is looking for to unlock the speaker, and allow you to hear traffic on the radio channel. When your radio receives the DTMF sequence that’s saved in Own ID and no additional DTMF signals [* see Delimiter below], after about a 2 second delay, the speaker will unlock and the speaker will produce the traffic on that channel.
Auto Reset Time
This value determines how much continuous channel dead-air time must occur after a successful decode (or PTT activation) before the radio reverts to normal muted decoder operation (remains silent until it again hears the desired DTMF sequence). Here’s a concrete example: assume the Auto Reset Time variable was set to 7 seconds. If the decoder heard the correct DTMF sequence, the radio would operate with noise squelch (or CTCSS squelch, or DCS squelch) until the channel was idle continuously for 7 seconds. If there were a series of transmissions on the channel and the channel was continuously idle for no more than 6 seconds, the radio would continue to produce audio from its speaker when the channel was in use. Only after the channel had been continuously idle for 7 seconds would the radio revert to being muted until it again heard the correct DTMF sequence (or there was a PTT activation).
If the channel was very busy after a DTMF page was received, the radio might remain unmuted for several minutes, producing audio traffic from the radio’s speaker that is not of interest to the operator. I’ve found two ways to re-engage the decoder, so that it will mute the audio until the next correct 2Tone pair is received. The easiest way to reset the decoder is to switch to an adjacent memory channel and then switch back to the working memory channel. A quick press of the DOWN and the UP buttons will accomplish that. The other way to reset the decoder is to turn the radio off and back on. Given the boot time needed to return the radio to a normal state after power-on, the switching channel method is much quicker.
Delimiter
But there is an exception to the “no additional DTMF signals” after receiving the Own ID sequence. If the DTMF detector finds the Delimiter character right after the last DTMF symbol in your Own ID, it will continue to accumulate received DTMF symbols until there are no more DTMF symbols for about 2 seconds. The decoder will then unlock the speaker so that the operator can hear voice traffic on the channel. It will also show the digits that followed the Delimiter character on the radio’s LCD screen prefaced with a “C”. The idea is that DTMF pages (or calls) can be formed as ToStation Own ID, Delimiter, FromStation Own ID. If the DTMF sequence before the Delimiter matches the Own ID of the receiving station the radio will unlock its speaker and will display the Own ID of the sending station on the receiving station’s LCD.
Let’s look at a concrete example of this. Assume that station A has an Own ID value of 357 and station B has an Own ID value of 123 and both A and B have selected “*” as their Delimiter value.
Case 1: If station A sends DTMF 123, then about 2 seconds later the speaker of station B will unlock and B will be able to hear what A transmits, but there’s no indication on the LCD display of station B as to who made the call.
Case 2: If station A sends DTMF 123357 station B will do nothing because the received DTMF sequence did not match station B’s Own ID value (note that no Delimiter symbol was transmitted).
Case 3: If station A sends DTMF 123*357, then about 2 seconds later the speaker of station B will unlock and B will be able to hear what A transmits because the DTMF sequence before the delimiter matched that of station B’s Own ID value. Additionally, Station B’s LCD display will indicate C357, showing that a station with Own ID of 357 (Station A) made the call.
The Unknowns
What I don’t know at this point about DTMF decoding in these radios:
- How deep into the noise will these DTMF decoders work?
- How much false decoding occurs in high noise situations?
—-
Digressing for a moment, when the Signal value for a memory channel is set to None, the Signaling button seems to send the data in the DTMF memory, like an DTMF autodialer. Use system Menu 10 (Signal Type) to determine which DTMF memory (1-16 for DTMF) will be used when the Signaling button is pressed. The type of signaling on a particular channel is determined by the PC software setting. You can’t change the signaling type (DTMF, 2T, 5T) from the front panel. The only front panel control you have over signaling is the memory location used for outpulsing.